Configuring MikroTik hAP ax2 for Wi-Fi and Wired 802.1X with EasyRadius
This guide shows you how to use EasyRadius as the RADIUS server for a MikroTik hAP ax2. You can protect the Wi-Fi, the Ethernet ports, or both. Once it's set up, a device only gets network access after it authenticates with its certificate.
Steps 1 and 2 are the same for Wi-Fi and Ethernet. In Step 3, pick the Wi-Fi or Ethernet tab. The tab you pick also switches the tabs in Troubleshooting.
Prerequisites
Before you begin, make sure you have the following in place:
| Requirement | Details |
|---|---|
| MikroTik hAP ax2 | Powered on, with RouterOS v7 (the hAP ax2 ships with it). |
| EasyRadius instance | Provisioned and active. See On-boarding EasyRadius. |
| Client certificates | Devices have a client certificate from EasyScep (or another CA trusted by EasyRadius), deployed through Intune. |
| RADIUS client | A RADIUS client in EasyRadius (Settings → Radius Clients) for the public IP address the hAP connects from, with a shared secret. |
| EasyRadius endpoints | The IP address and port of the primary and secondary endpoint, from the EasyRadius Dashboard under Endpoints. |
| Intune profiles | For Wi-Fi: an Intune Wi-Fi profile (see Intune Wi-Fi EAP-TLS Setup). For Ethernet: an Intune Wired network profile with EAP type EAP-TLS and the same certificates (see the Ethernet tab in Step 3), or manual setup in Windows. |
| Administrator access | The hAP admin password (printed on the sticker on the bottom of the device) and admin access to the EasyRadius administration portal. |
| A computer with an Ethernet port | Used to configure the hAP. |
Tip: Use a long, random shared secret (we recommend 32 or more characters) and store it somewhere safe, such as a password manager. You'll need it in Step 2.
Step 1: Sign in and update the hAP
1.1 Sign in
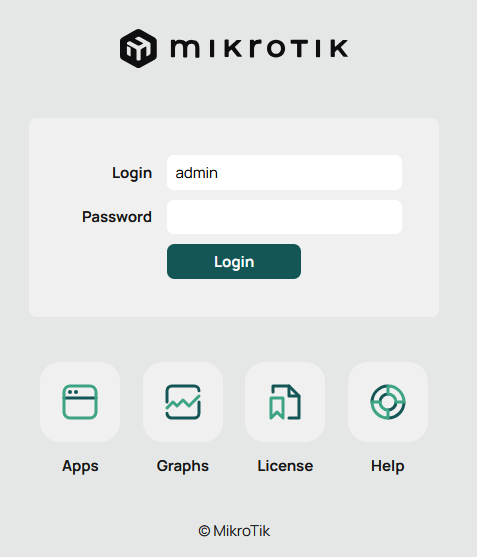
- On the computer connected to the hAP-ax2, open a browser and go to http://192.168.88.1.
- Enter admin as Login, and the password printed on the sticker on the bottom of the hAP.
- Click Login. If you are asked to set a new password, do so and store it somewhere safe, such as a password manager.
1.2 Switch to Advanced mode
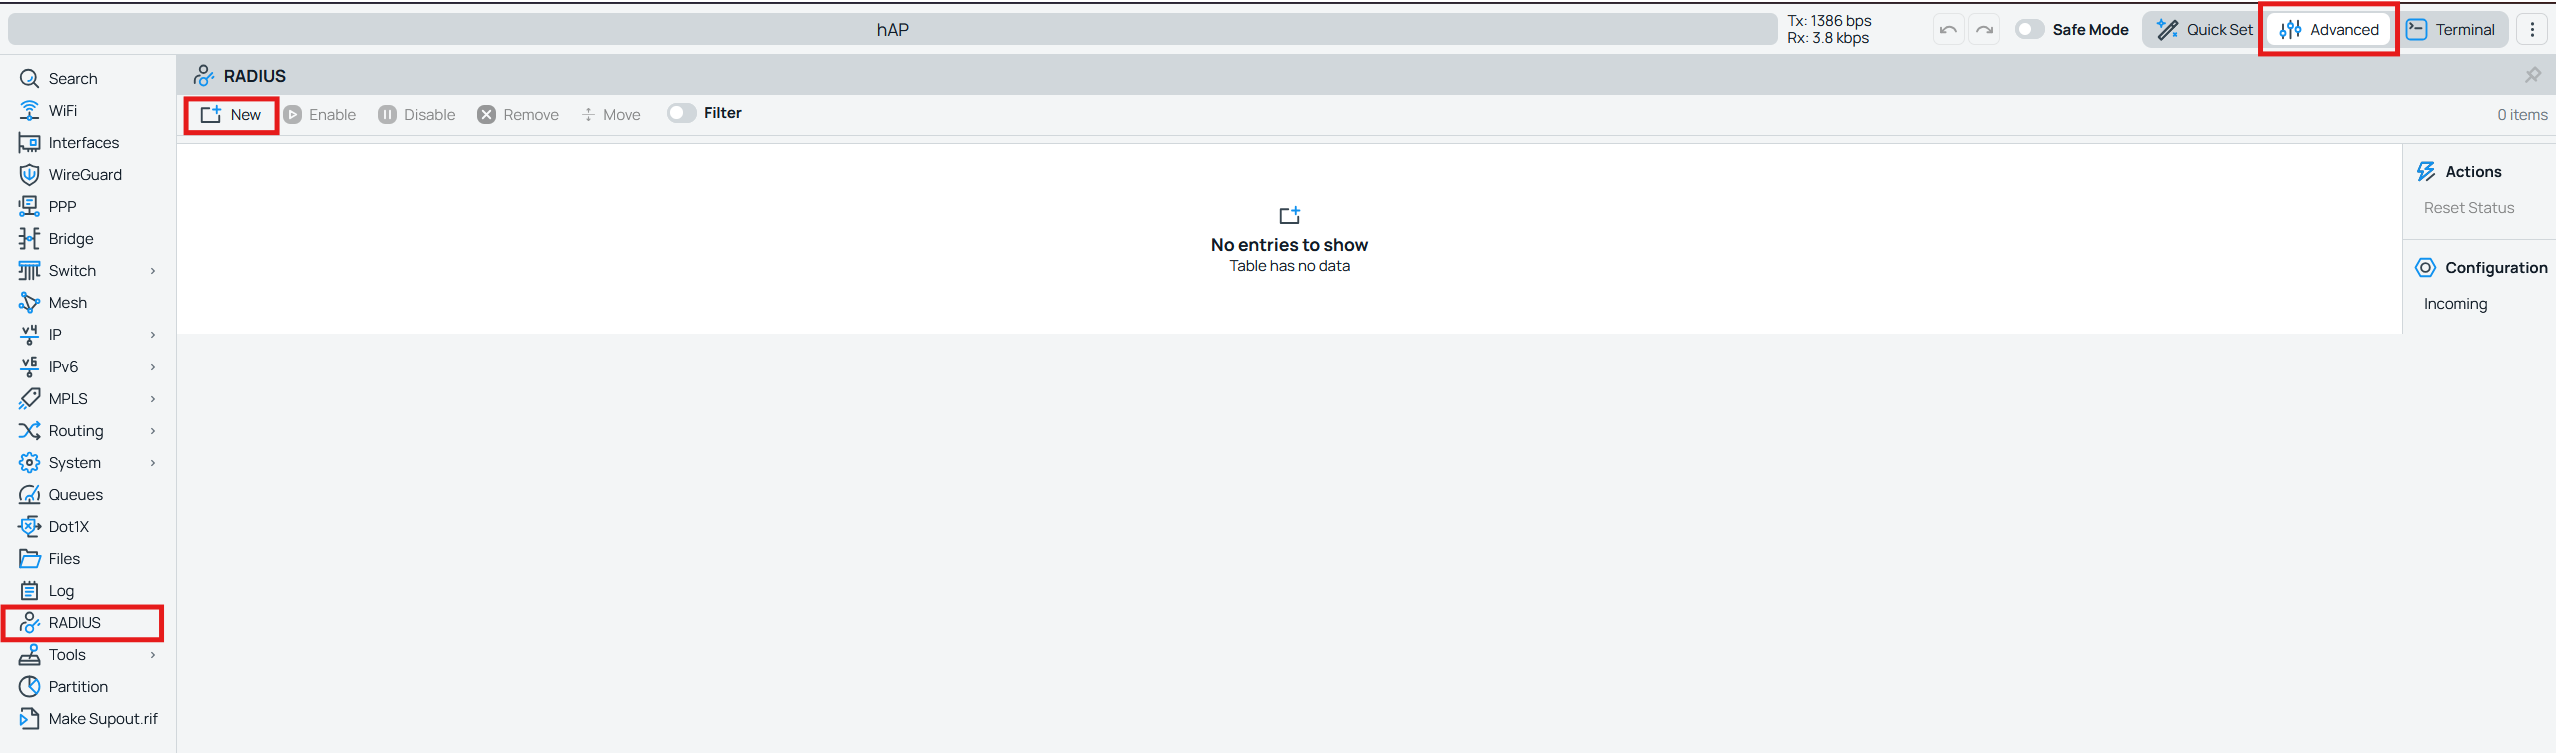
After signing in, the hAP opens in Quick Set. Click Advanced in the top-right corner to show the full menu on the left. The rest of this guide uses Advanced mode.
1.3 Update RouterOS and the board firmware
- Go to System → Check For Updates. Make sure Channel is set to stable.
- If a newer version is available, click Download & Install. The hAP restarts by itself. Wait 1 to 3 minutes and sign in again.
- Go to System → RouterBOARD and click Upgrade. This updates the board firmware to match RouterOS.
- Go to System → Reboot to restart the hAP and apply the firmware.
Important: Do not unplug the power while the hAP is updating.
Note: Don't skip the update. Older RouterOS versions don't send the Message-Authenticator attribute that EasyRadius requires, and authentication then fails with nothing in the EasyRadius log. See Authentication fails after an older RouterOS version.
Step 2: Add EasyRadius as a RADIUS server on the hAP
2.1 Create a RADIUS server entry
On the hAP, click RADIUS in the left menu, then click New.
2.2 Fill out the server details
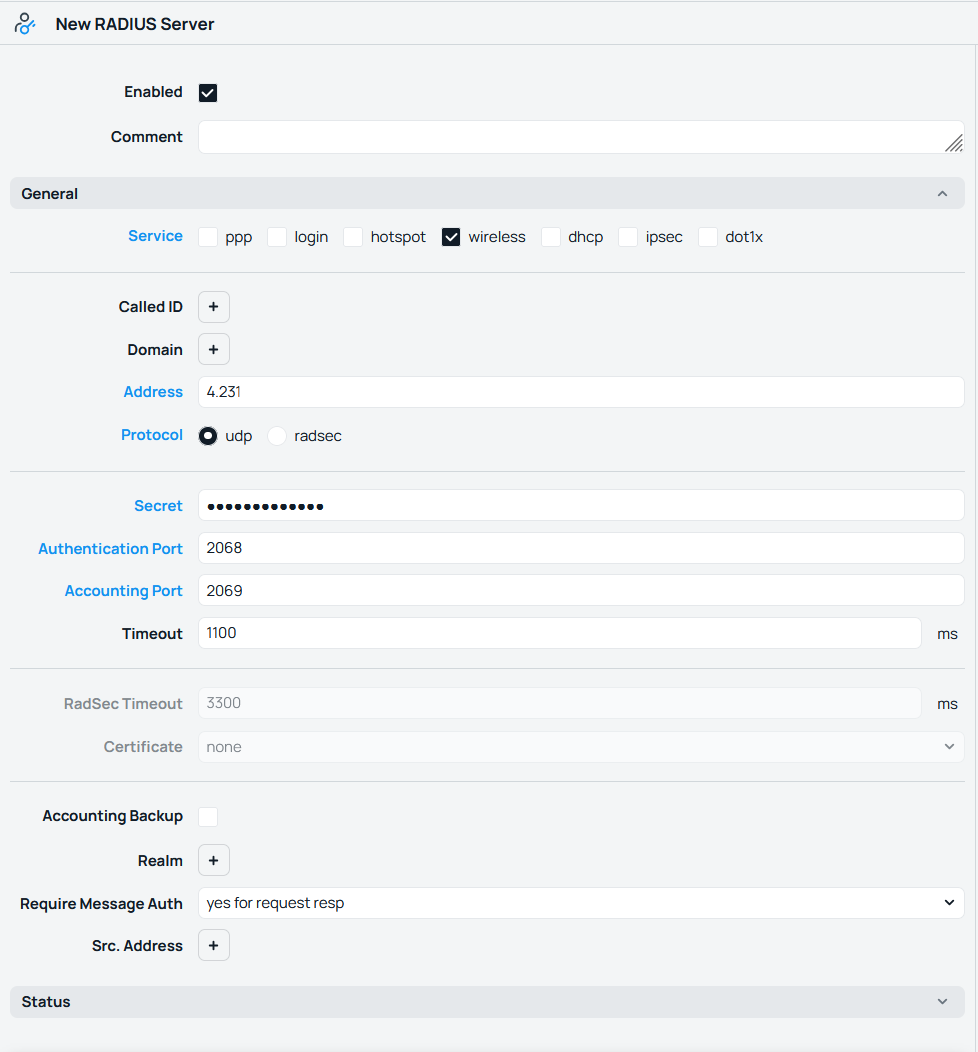
Fill out the form with the primary endpoint's details:
| Field | Value |
|---|---|
| Service | Tick wireless for Wi-Fi, dot1x for Ethernet, or both if you set up both. |
| Address | The primary endpoint's IP address from the EasyRadius Dashboard. |
| Protocol | udp |
| Secret | The same shared secret as the RADIUS client in EasyRadius (see Prerequisites). |
| Authentication Port | The port from the EasyRadius Dashboard. |
| Accounting Port | The authentication port + 1 (e.g. 2069 if the authentication port is 2068). |
| Timeout | At least 1100 ms. We recommend 3000 ms. |
| Require Message Auth | Leave at yes for request resp. |
Leave all other fields at their default values, then click OK.
Important: The shared secret must be identical on the hAP and in EasyRadius. A mismatch will cause authentication to fail.
Note: The default timeout of 300 ms is too short for a RADIUS server on the internet: requests time out before EasyRadius answers. See RADIUS requests time out.
Note: Protocol must be udp because EasyRadius must accept RADIUS (UDP). If your instance only offers RadSec, see EasyRadius only accepts RadSec.
2.3 Add the secondary endpoint
If your instance has a secondary endpoint, repeat 2.1 and 2.2 with the secondary endpoint's IP address and port, and the same shared secret.
Note: The hAP uses the RADIUS servers in the order they're listed and moves on to the next one when a server doesn't answer. Adding the secondary endpoint is what gives you failover between the two regions. See What happens if one region is unavailable?
Step 3: Configure Wi-Fi or Ethernet
Choose the tab for the connection type you want to protect. If you want both, complete both tabs.
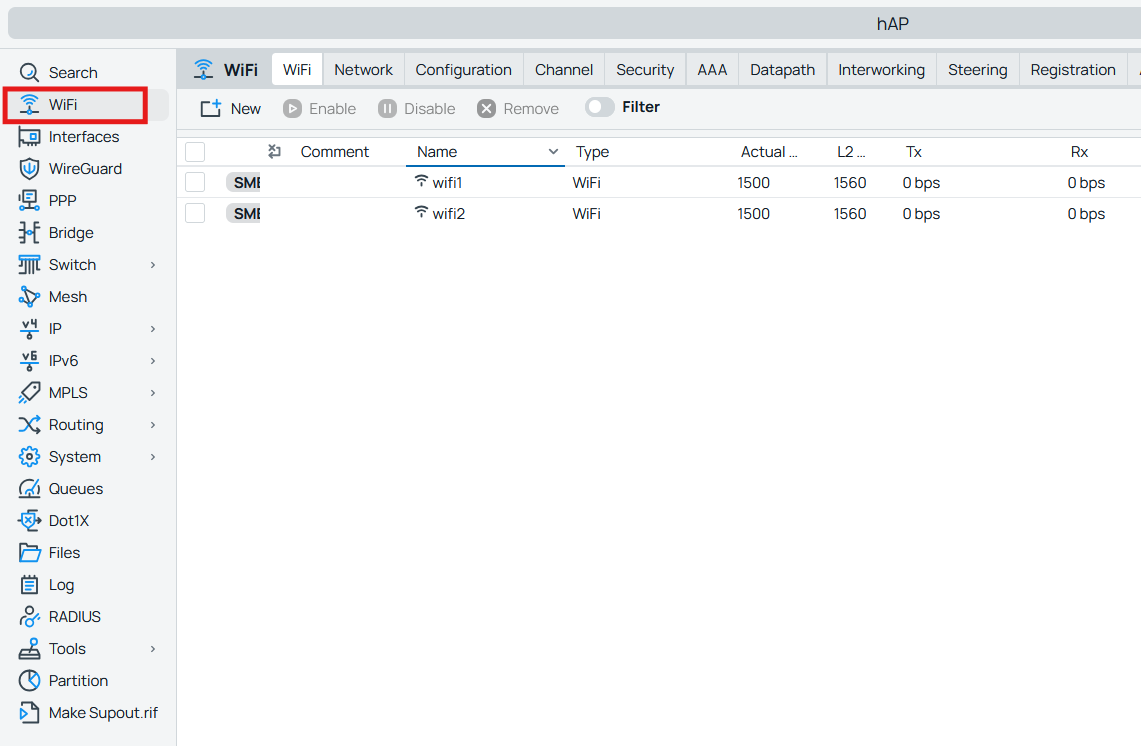
Click WiFi in the left menu. The WiFi tab lists two interfaces: wifi1 (5 GHz) and wifi2 (2.4 GHz). Click wifi1 to open it.
3.2 Set the network name and country
In the Configuration section:
- SSID: Enter your network name according to your Intune profile.
- Country: Select your country, e.g. Denmark.
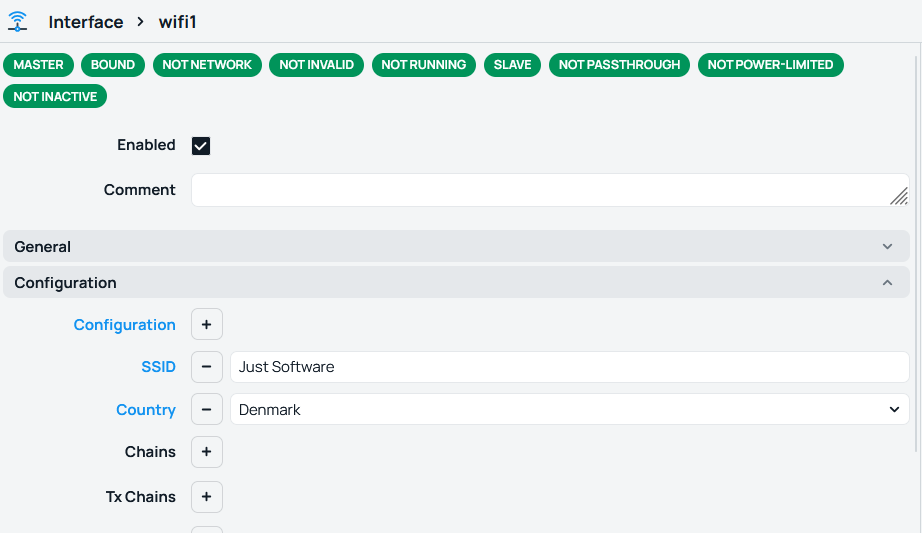
Important: The SSID must exactly match the SSID in your Intune Wi-Fi configuration profile, including upper and lower case and spaces. If they differ, devices managed by Intune won't connect. See The network is visible, but the device doesn't connect.
3.3 Select the authentication types
In the Security section, under Authentication Types:
- Tick WPA2 EAP and WPA3 EAP.
- Untick everything else, including all PSK options.
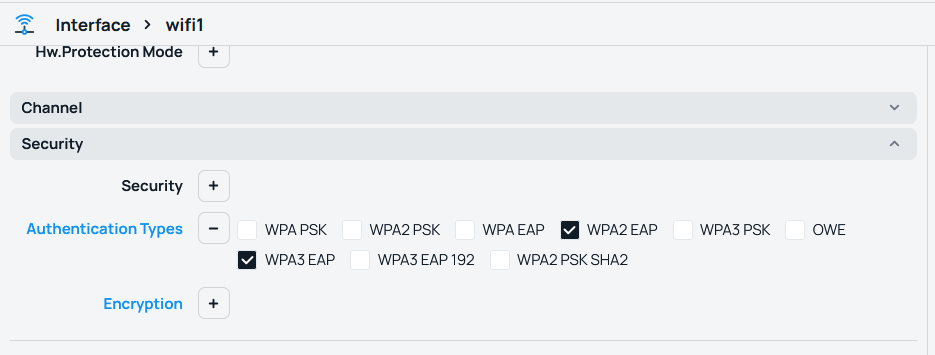
Further down in the Security section, tick EAP Accounting.

Note: Leave EAP Methods, EAP Certificate Mode, EAP TLS Certificate and EAP Username empty. These are only used when the hAP itself joins another network as a client. As an access point, the hAP passes the device's certificate on to EasyRadius, and the EAP method (EAP-TLS) comes from the Intune Wi-Fi profile.
Click OK to save.
Open wifi2 and repeat 3.2 to 3.4 with the same SSID, country and security settings, so devices can connect on both 5 GHz and 2.4 GHz. Click OK to save.
- On a device that has the Intune Wi-Fi profile and client certificate, open the list of available Wi-Fi networks.
- Select your network and click Connect.
The device connects without asking for a username or password: it uses its certificate automatically. If it asks for a username and password, see Windows asks you to sign in.
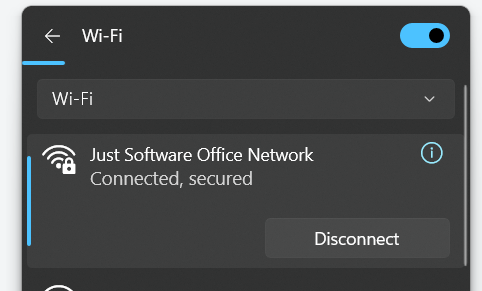
On the hAP, go to WiFi → Registration. The device should be listed with your SSID.

In the EasyRadius administration portal, open Logs. You should see a Login OK entry with the device's certificate, NAS-Port-Type: Wireless-802.11, and the Wi-Fi interface (e.g. wifi1).

If nothing shows up in the log, see Nothing appears in the EasyRadius log. If the device is listed but has no internet, see Connected, but no network access.
🎉 You're all set! Your devices now connect to the hAP ax2 Wi-Fi with EasyRadius authentication.
3.1 Allow 802.1X on the RADIUS server entries
Click RADIUS in the left menu and open each EasyRadius server entry you created in Step 2. Under Service, make sure dot1x is ticked (together with wireless, if you also use Wi-Fi). Click OK.
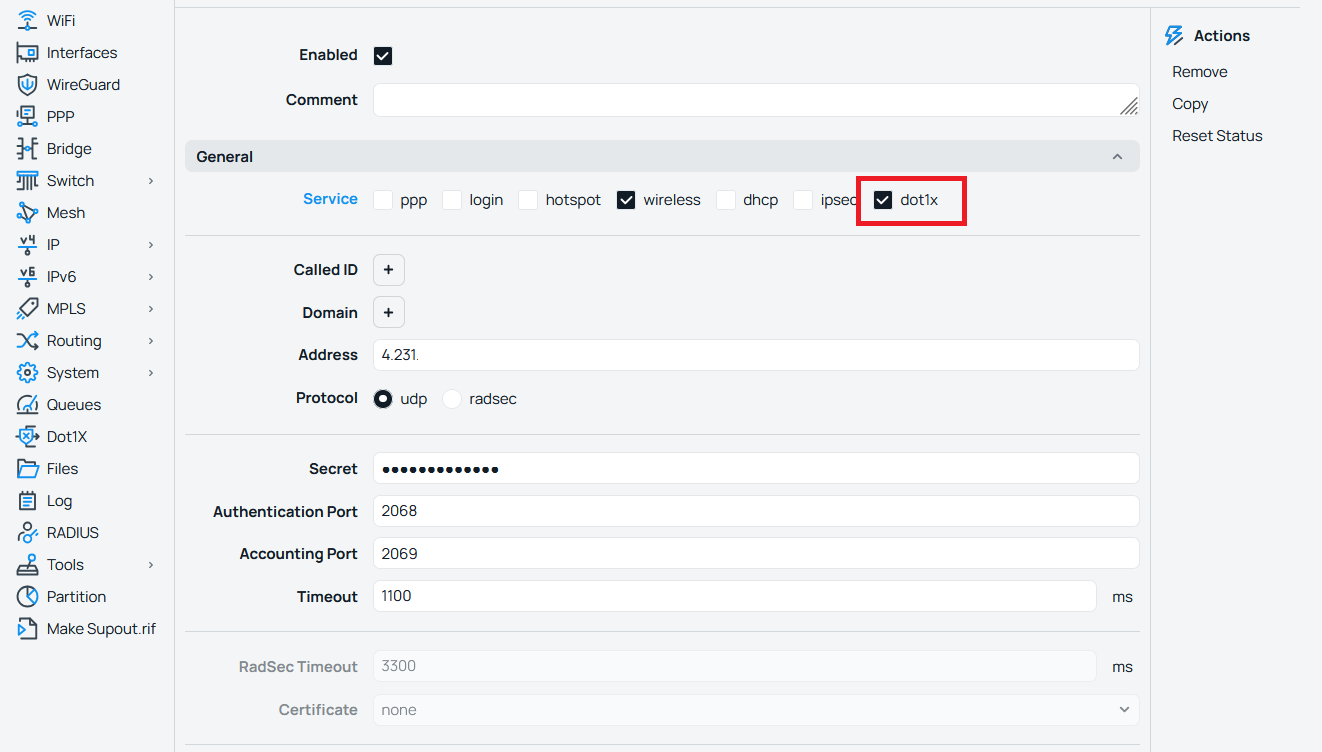
3.2 Create a Dot1X server for the port
Click Dot1X in the left menu, open the Server tab and click New.
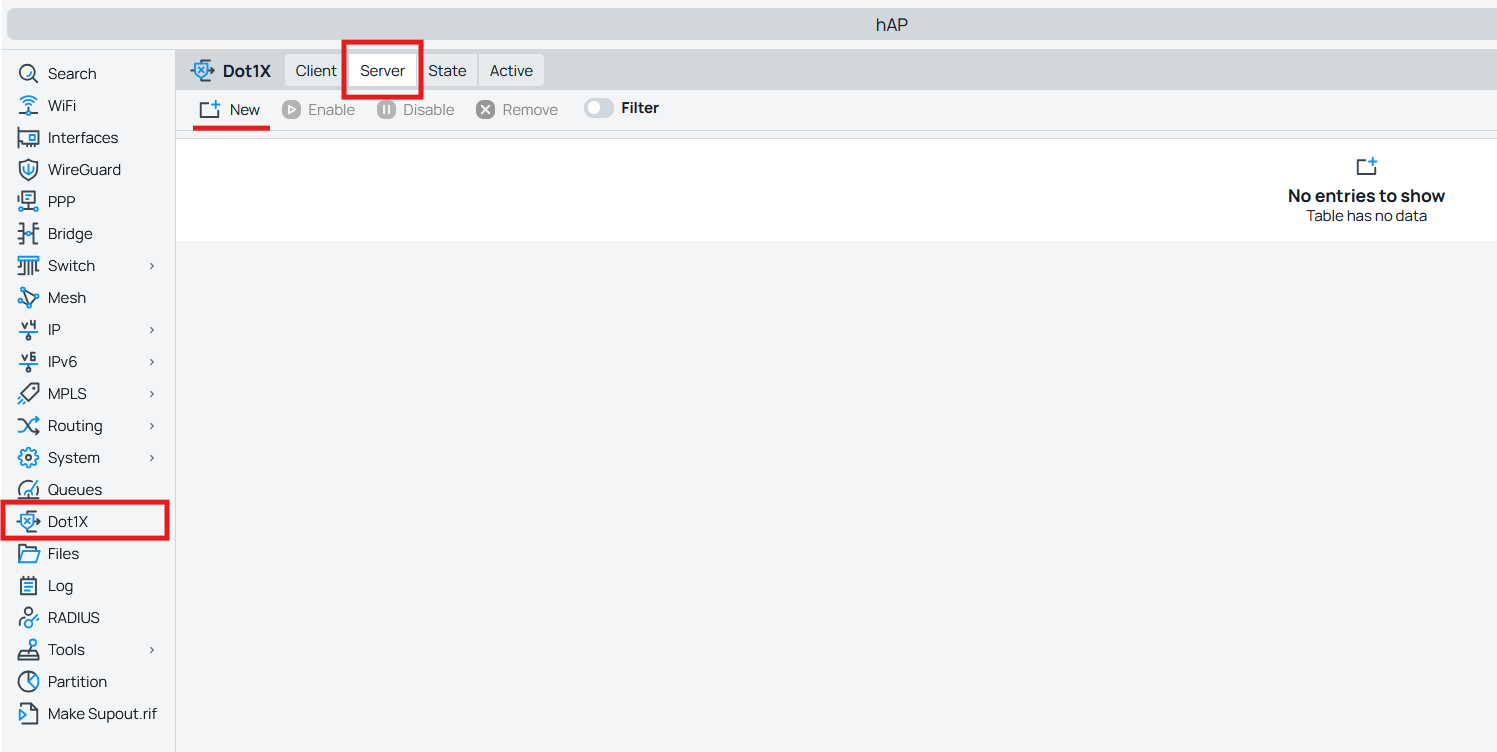
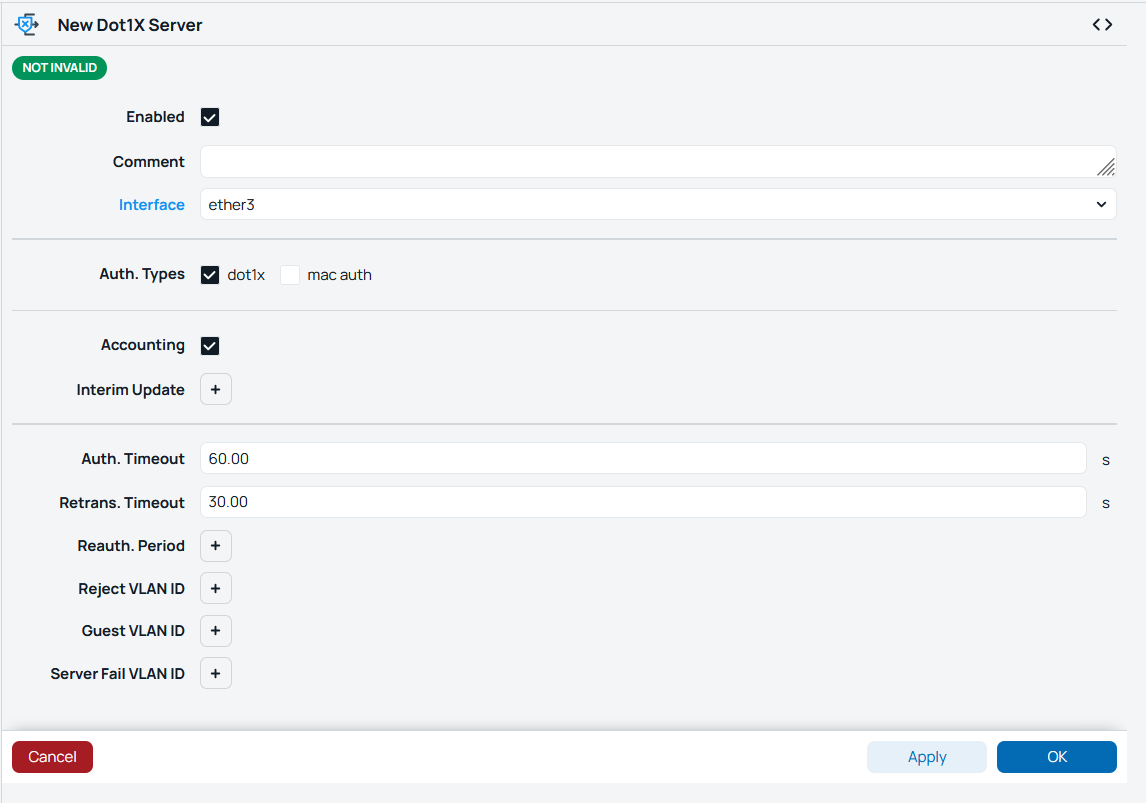
Fill out the form:
- Interface: The port you want to protect, e.g. ether3.
- Auth. Types: Tick dot1x only.
- Accounting: Ticked.
Leave all other fields at their default values, then click OK. Repeat for each port you want to protect (e.g. ether4 and ether5).
Important: Do not protect the port your computer is using to configure the hAP (port 2 in this guide) until you have confirmed that 802.1X works. Never protect ether1 (the internet port) or ports with devices that have no certificate, such as printers or access points. Otherwise you can lock yourself out. If that happens, see You've locked yourself out of the hAP.
3.3 Check the wired VLAN in EasyRadius
In the EasyRadius administration portal, go to Settings → VLANs and check that the default VLAN for wired connections is 0 (no VLAN). The hAP's default setup does not use VLANs, so a device that is sent a VLAN will authenticate but get no network access. See VLAN assignment.
- If the computer has a wired network profile from Intune: nothing to do. The computer authenticates automatically with its certificate.
- If there's no wired profile: set up 802.1X manually in Windows (see Manual setup in Windows under Troubleshooting).
Note: A Wi-Fi profile from Intune does not cover Ethernet. A separate Wired network profile is needed (in Intune: Devices → Configuration → Create → Windows 10 and later → Templates → Wired network), using the same SCEP certificate and trusted root certificate as the Wi-Fi profile, with EAP type EAP-TLS.
- On a device that has the Intune wired profile and client certificate, turn Wi-Fi off so that only the cable is used.
- Connect the device to a protected port (e.g. port 3).
- Wait 10 to 30 seconds. No login window should appear.
In Settings → Network & internet → Ethernet, the connection shows Connected, signed in.

If a login window appears, see Windows asks you to sign in. If nothing happens at all, see The computer never tries to authenticate.
On the hAP, go to Dot1X → Active. The port should be listed with the device's certificate name as Username and dot1x as the authentication type.

In the EasyRadius administration portal, open Logs. You should see a Login OK entry with the device's certificate for a wired connection.
If the port isn't listed, see Nothing appears under Dot1X → Active. If nothing shows up in the log, see Nothing appears in the EasyRadius log.
🎉 You're all set! Your devices now authenticate on the hAP ax2's Ethernet ports with EasyRadius.
🛠️ Troubleshooting
See what the hAP is doing
- RADIUS counters: click RADIUS in the left menu and open the EasyRadius entry. The Status section shows how many requests were sent, accepted, rejected, and timed out.
- Log: click Log in the left menu. To see RADIUS details, go to System → Logging, click New, and add a rule with the topics radius and debug. Remove the rule again when you're done, because it's very verbose.
- EasyRadius: the Logs page in the EasyRadius portal shows every request that reached EasyRadius, including rejected ones and requests from unknown clients. See Logs.
Manual setup in Windows
This applies to Ethernet only. Follow Manual setup in Windows in the TP-Link guide. The Windows steps are the same for any switch or router.
Common problems
-
Windows asks you to sign in with a username and password: Windows has no profile that tells it to use the certificate. Don't type a password, because it will always be rejected. Check that the Intune Wi-Fi or wired profile and the client certificate have reached the device (see Intune Wi-Fi EAP-TLS Setup). For Ethernet without an Intune profile, follow Manual setup in Windows.
-
The EasyRadius log shows
eap_peap/mschap: FAILED: No NT-Password: The device is using PEAP with a password instead of the certificate. Change the EAP type to EAP-TLS (Microsoft: Smart Card or other certificate in Windows) in the Intune profile or manually, then reconnect. -
Nothing appears in the EasyRadius log: The hAP isn't reaching EasyRadius, or EasyRadius doesn't recognise it. Check, in this order:
- The Address, Authentication Port and Secret in the hAP's RADIUS entry match the EasyRadius Dashboard and RADIUS client (2.2).
- The RADIUS entry has the right Service ticked: wireless for Wi-Fi, dot1x for Ethernet.
- The RADIUS client in EasyRadius uses your site's public IP address, not a
192.168.x.xaddress. From a device behind the hAP, visit ifconfig.me and compare. See RADIUS clients. - RouterOS is up to date (1.3). See Authentication fails after an older RouterOS version.
-
RADIUS requests time out: The timeouts counter on the RADIUS entry goes up. Raise the Timeout on each RADIUS entry to
3000ms (2.2), and check that any firewall in front of the hAP allows outbound UDP to both EasyRadius endpoints on the authentication port and the port after it. -
EasyRadius only accepts RadSec: Authentication fails even though the address, port, and secret are correct. In the EasyRadius portal, go to Settings → System and set the protocol to Both (or RADIUS (UDP)), then save. This guide sends RADIUS over UDP. See Protocols and ports.
-
Authentication fails after an older RouterOS version: EasyRadius requires the Message-Authenticator attribute on every request, to protect against the Blast-RADIUS attack. Older RouterOS versions don't send it, so EasyRadius drops the requests. Update RouterOS and the board firmware (1.3). See Certificate validation and packet security.
-
You've locked yourself out of the hAP: Connect the computer to a port without 802.1X (or to the Wi-Fi, if it works), sign in, and go to Dot1X → Server to remove or disable the entry for the port you need. If you can't reach the hAP at all, reset it to its default configuration with the Reset button (see MikroTik's documentation for the hAP ax2) and set it up again.
-
The network isn't visible: Check that wifi1 and wifi2 are enabled under WiFi, and that the SSID and Country are set (3.2).
-
The network is visible, but the device doesn't connect: The SSID or security type doesn't match the Intune Wi-Fi profile. The SSID must match exactly, including upper and lower case (3.2). The Intune profile must use WPA2-Enterprise or WPA3-Enterprise, which matches WPA2 EAP and WPA3 EAP on the hAP (3.3). Also check that wifi1 and wifi2 have the same settings (3.5).
-
Nothing appears in the EasyRadius log for Wi-Fi, but Ethernet works: The RADIUS entry doesn't have the wireless service ticked (2.2).
-
Connected, but no network access: The device authenticated, but EasyRadius may be sending it a VLAN that the hAP's default setup doesn't use. In the EasyRadius portal, go to Settings → VLANs and check that the default VLAN for Wi-Fi is
0(no VLAN). See VLAN assignment.
-
The computer never tries to authenticate: On Windows, the Wired AutoConfig service must be running. See Manual setup in Windows. Also check that Wi-Fi is off on the computer (3.5).
-
Nothing appears under Dot1X → Active: Check that there's a Dot1X server entry for the port the cable is plugged into (3.2), and that Wired AutoConfig is running on the computer.
-
Nothing appears in the EasyRadius log for Ethernet, but Wi-Fi works: The RADIUS entry doesn't have the dot1x service ticked (3.1).
-
Authentication succeeds, but there's no network: 802.1X is working. EasyRadius is probably sending a VLAN: check that the default VLAN for wired connections is
0(3.3). If it is, look at the hAP's bridge and DHCP settings.